Simulation
This section explains the basic principles of configuring a simulation run via Python
scripts or XML files. The focus lies on the more central methods, especially those
provided by the class HydPy.
Python
The Quick Start’s Run HydPy section demonstrates the straightest way to perform a simulation via the Python shell or a Python script without deviating from any default settings. Here, we split the procedure into smaller steps to discuss more details about using a project’s data to set a HydPy instance in a simulation-ready state. Also, we give some first ideas about possible modifications and ways to save simulation results.
Please unzip the HydPy-H-Lahn example project into your preferred working directory and define the workingdir variable as exercised in the Quick Start section:
>>> workingdir = "C:/temp"
Proceed like in the Quick Start section by activating the working directory,
importing HydPy and pub, initialising a HydPy instance, and defining the period
to consider:
>>> import os
>>> os.chdir(workingdir)
>>> from hydpy import HydPy, pub
>>> hp = HydPy("HydPy-H-Lahn")
>>> pub.timegrids = "1996-01-01", "1997-01-01", "1d"
We now define a small helper function that checks if a directory or file we are talking about exists:
>>> def assert_exists(*components):
...     components = (workingdir,) + components
...     path = os.path.join(*components)
...     assert os.path.exists(path)
First, we must prepare the network. All loadable networks are usually within the network subfolder:
>>> assert_exists("HydPy-H-Lahn", "network")
The NetworkManager instance of the pub object can give us more information. For
example, it can tell us that the HydPy-H-Lahn project only comprises one
subfolder and hence only one “network version”:
>>> pub.networkmanager.availabledirs
Folder2Path(default=.../HydPy-H-Lahn/network/default)
>>> assert_exists("HydPy-H-Lahn", "network", "default")
The NetworkManager instance assumes this single directory as the desired working
directory:
>>> assert pub.networkmanager.currentdir == "default"
The default directory consists of three Python files, for example, headwaters.py:
>>> assert_exists("HydPy-H-Lahn", "network", "default", "headwaters.py")
If we call method prepare_network(), HydPy builds a network that consists of all
the elements and nodes defined in these three files:
>>> hp.prepare_network()
>>> hp.nodes
Nodes("dill_assl", "lahn_kalk", "lahn_leun", "lahn_marb")
>>> hp.elements
Elements("land_dill_assl", "land_lahn_kalk", "land_lahn_leun",
         "land_lahn_marb", "stream_dill_assl_lahn_leun",
         "stream_lahn_leun_lahn_kalk", "stream_lahn_marb_lahn_leun")
Besides this, the Selections instance of pub now contains three user-defined
Selection instances:
>>> pub.selections
Selections("headwaters", "nonheadwaters", "streams")
Each user-defined selection corresponds to one network file, meaning it has the same name and comprises the same nodes and elements:
>>> pub.selections.headwaters
Selection("headwaters",
          nodes=("dill_assl", "lahn_marb"),
          elements=("land_dill_assl", "land_lahn_marb"))
A fourth selection, named “complete”, is also accessible. The property
complete creates it automatically upon request by combining the contents
of the user-defined selections. Right after calling prepare_network(), the
HydPy instance and complete have the same nodes and elements:
>>> assert hp == pub.selections.complete
Use method update_devices() to concentrate only on a part of the complete
network. Here, we restrict the simulation to the headwater catchments:
>>> hp.update_devices(selection=pub.selections.headwaters)
>>> assert hp == pub.selections.headwaters
So far, we prepared the network and selected the subnetwork we are interested in, but a model that could perform any actual simulation is still missing:
>>> from hydpy import attrready
>>> assert not attrready(hp.elements.land_dill_assl, "model")
The ControlManager instance of pub informs us about the only available set of model
types and parameterisations, which is available in a directory named default, the now
relevant working directory:
>>> pub.controlmanager.availabledirs
Folder2Path(default=.../HydPy-H-Lahn/control/default)
>>> assert pub.controlmanager.currentdir == "default"
This directory contains one Python file for each element of the current selection, for example, land_dill_assl.py:
>>> assert_exists("HydPy-H-Lahn", "control", "default", "land_dill_assl.py")
Calling method prepare_models() lets HydPy execute these files to create the
required main models and their submodels, which it then connects to the respective
elements:
>>> hp.prepare_models()
>>> model = hp.elements.land_dill_assl.model
>>> model
hland_96
    aetmodel: evap_aet_hbv96
        petmodel: evap_pet_hbv96
    rconcmodel: rconc_uh
All parameter values are already set:
>>> model.parameters.control.icmax
icmax(field=1.0, forest=1.5)
>>> model.aetmodel.petmodel.parameters.derived.altitude
altitude(420.53445)
However, initial condition values are still missing:
>>> model.sequences.states.uz
uz(nan)
We can use the ConditionManager to discover the available sets of initial conditions.
There is only one set, and this is suitable for 1 January 1996:
>>> pub.conditionmanager.availabledirs
Folder2Path(init_1996_01_01_00_00_00=.../HydPy-H-Lahn/conditions/init_1996_01_01_00_00_00)
The ConditionManager is unique as it differentiates between initial and final
conditions, which correspond to the start and end of the currently selected simulation
period. If not overwritten by currentdir (see below), property
inputpath creates the expected path to the input conditions based on
the set prefix (defaults to init) and the current simulation start
date:
>>> from hydpy import repr_
>>> repr_(pub.conditionmanager.inputpath)
'.../HydPy-H-Lahn/conditions/init_1996_01_01_00_00_00'
As for control files, there is also one condition file per element, like, for example, land_dill_assl.py:
>>> assert_exists(
...     "HydPy-H-Lahn", "conditions", "init_1996_01_01_00_00_00", "land_dill_assl.py"
... )
Method prepare_models() sets all condition sequences’ values by evaluating the
relevant condition files:
>>> hp.load_conditions()
>>> model.sequences.states.uz
uz(7.25228)
The input time series is the only data still missing to run a simulation:
>>> assert not attrready(model.sequences.inputs.t, "series")
The SequenceManager informs us there is only one time series directory, and it is
named default:
>>> pub.sequencemanager.availabledirs
Folder2Path(default=...HydPy-H-Lahn/series/default)
>>> assert pub.sequencemanager.currentdir == "default"
Reading time series data is a two-step procedure. First, one calls the suitable
“prepare method”. When called without arguments, methods like
prepare_allseries() (which, as its name suggests, addresses the time series of
all relevant sequences) allocate the necessary space in RAM for handling the time
series data:
>>> hp.prepare_allseries()
The second step is to call the suitable “load methods”. In this example, method
load_inputseries() loads the required (meteorological) input time series:
>>> hp.load_inputseries()
If not specified otherwise, HydPy reads time series from and writes them to ASCII files.
For example, the T time series data of the hland_96 model instance
handled by the element land_dill_assl stems from the ASCII file
land_dill_assl_hland_96_input_t.asc:
>>> assert_exists(
...     "HydPy-H-Lahn", "series", "default", "land_dill_assl_hland_96_input_t.asc"
... )
>>> from hydpy import print_vector
>>> print_vector(model.sequences.inputs.t.series[:5])
0.0, -0.5, -2.4, -6.8, -7.8
Class SequenceManager provides more options than just the directory-related ones.
For example, you can use option filetype to read discharge
measurement data from the NetCDF file obs_q.nc:
>>> with pub.sequencemanager.filetype("nc"):
...     hp.load_obsseries()
>>> assert_exists("HydPy-H-Lahn", "series", "default", "obs_q.nc")
>>> node = hp.nodes.dill_assl
>>> print_vector(node.sequences.obs.series[:5])
4.84, 5.19, 4.22, 3.65, 3.61
Finally, with all required preprocessing done, we can conduct the simulation:
>>> hp.simulate()
HydPy does not apply multi-threading by default. You can modify the threads
option to increase simulation speed by processing model instances in parallel. If your
machine has, for example, four CPUs, you may want to set the number of additional
threads also to four:
>>> with pub.options.threads(4):
...     hp.simulate()
By doing so, HydPy actually works with five threads. The already active main thread coordinates four workers, which perform the individual simulation runs of the involved models in four temporarily created new threads.
Preparing for a multi-threaded simulation might take a little time for larger projects.
Hence, HydPy caches some of the information gathered before the first multi-threaded
run. Still, you might gain additional speed-ups when doing repeated calculations for
the same network (for example, during parameter calibration) by saving the
Parallelisability and Queue objects returned by method
prepare_multithreading() and passing them repeatedly to method
simulate_multithreaded():
>>> parallelisability, queue = hp.prepare_multithreading()
>>> with pub.options.threads(4):
...     for _ in range(2):
...         hp.simulate_multithreaded(parallelisability, queue)
You can modify the returned Parallelisability and Queue instances to
adjust them to the specific network at hand, which might increase performance even
more, but this requires a deep understanding of HydPy.
Note that HydPy’s multi-threading mode does not result in any speed-ups when working in the pure Python mode (Python itself does not fully support multi-threading) and is not incompatible with reading time series data from or writing it to NetCDF files “just-in-time” during simulation runs (the underlying library is not thread-safe). Also, be aware that, even on the same machine and operating system, “normal” and multi-threaded simulations might lead to slightly different results due to different floating point rounding errors of the involved mathematical operations. In our experience, these differences are negligible. If you encounter cases where such differences are relevant for practical applications, please report them via our issue tracker.
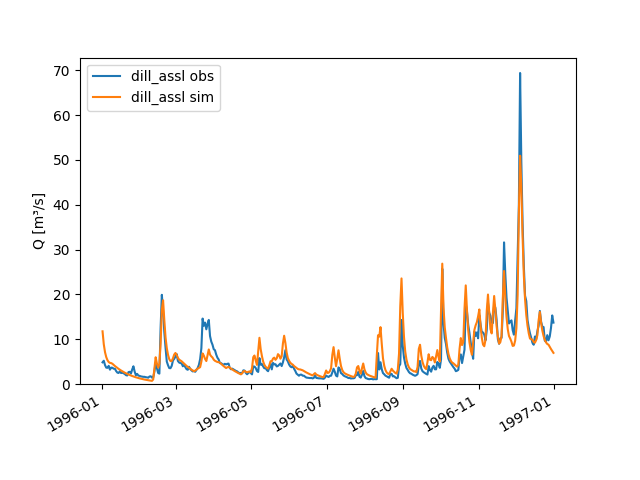
The Quick Start section already touches on plotting simulated and observed discharge:
>>> figure = node.plot_allseries()

We “prepared” not only the meteorological input and discharge observation time series
but also those of all sequences for which this is possible. This foresighted action
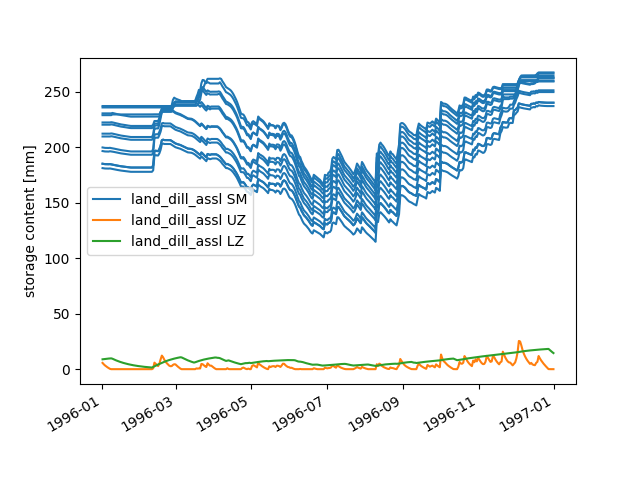
allows to gain insights into many internal calculation details. For example, we can
plot the time series of the zone-specific state sequence SM and the
subbasin-specific state sequences UZ and LZ:
>>> figure = hp.elements.land_dill_assl.plot_stateseries("sm", "uz", "lz")
There are numerous ways to modify the figure creation process or to change already created figures. As an example, we add a custom y-label:
>>> text = figure.get_axes()[0].set_ylabel("storage content [mm]")

Besides plotting time series, one might wish to save them for later evaluation.
Refraining from writing simulation results into the input data’s directory is
considered good practice. Hence, we use the SequenceManager to create a new time
series directory:
>>> pub.sequencemanager.currentdir = "output"
>>> assert_exists("HydPy-H-Lahn", "series", "output")
>>> pub.sequencemanager.availabledirs
Folder2Path(default=...HydPy-H-Lahn/series/default,
            output=...HydPy-H-Lahn/series/output)
Analogue to the “load methods”, HydPy offers multiple “save methods” for writing
simulated (and, if necessary, previously read) time series. Here, we use method
save_simseries() to write the simulated discharge series of the two selected
nodes:
>>> hp.save_simseries()
>>> assert_exists("HydPy-H-Lahn", "series", "output", "dill_assl_sim_q.asc")
Also of frequent interest (for example, in the context of operational forecasting) is writing the achieved final conditions, allowing us to continue the simulation later seamlessly.
By default, the outputpath property of class ConditionManager
creates the required target directory based on the simulation’s end date and informs
you about this action:
>>> with pub.options.printprogress(True):
...     path = pub.conditionmanager.outputpath
The condition manager's current working directory is not defined explicitly.  Hence, the condition manager writes its data to a directory named `init_1997_01_01_00_00_00`.
Directory ...init_1997_01_01_00_00_00 has been created.
>>> pub.conditionmanager.availabledirs
Folder2Path(init_1996_01_01_00_00_00=.../HydPy-H-Lahn/conditions/init_1996_01_01_00_00_00,
            init_1997_01_01_00_00_00=.../HydPy-H-Lahn/conditions/init_1997_01_01_00_00_00)
If this happens by accident, you can undo it in two steps. First, set the current working directory to the freshly created output path (note that we here actually pass a whole directory path instead of a directory name, which would, for example, allow us to write data beyond the usual HydPy project structure):
>>> pub.conditionmanager.currentdir = path
Second, apply the del statement to remove the unintentionally created directory:
>>> del pub.conditionmanager.currentdir
>>> pub.conditionmanager.availabledirs
Folder2Path(init_1996_01_01_00_00_00=.../HydPy-H-Lahn/conditions/init_1996_01_01_00_00_00)
Finally, we can create a directory with the desired name and write the conditions into it:
>>> pub.conditionmanager.currentdir = "my_conditions"
>>> pub.conditionmanager.availabledirs
Folder2Path(init_1996_01_01_00_00_00=.../HydPy-H-Lahn/conditions/init_1996_01_01_00_00_00,
            my_conditions=.../HydPy-H-Lahn/conditions/my_conditions)
>>> hp.save_conditions()
>>> assert_exists("HydPy-H-Lahn", "conditions", "my_conditions", "land_dill_assl.py")
Note that inputpath and outputpath now point to
the set working directory:
>>> assert pub.conditionmanager.inputpath.endswith("my_conditions")
>>> assert pub.conditionmanager.outputpath.endswith("my_conditions")
Assign None to currentdir to undo this without removing the directory:
>>> pub.conditionmanager.currentdir = None
>>> assert pub.conditionmanager.inputpath.endswith("init_1996_01_01_00_00_00")
>>> assert pub.conditionmanager.outputpath.endswith("init_1997_01_01_00_00_00")
>>> assert_exists("HydPy-H-Lahn", "conditions", "my_conditions", "land_dill_assl.py")
XML
HydPy’s XML support is a convenient alternative for people not interested in learning Python or for standardised tasks like operational forecasting. It is not as flexible as defining workflows in Python scripts, but (except for plotting) supports all features described above and many more.
HydPy offers so-called “script functions” that users can trigger from external
terminals like the Windows command line. Regarding the XML support, five of them
matter: run_simulation(), xml_validate(), xml_replace(), start_server(), and
await_server(). The latter two functions deal with the advanced topic of letting HydPy
act as a server that can interact with client programs like OpenDA, which is beyond
the User Guide’s scope. Hence, we will focus on run_simulation()
in the following and also give some notes on xml_validate() and xml_replace().
The HydPy-H-Lahn example project comes with three working XML files, of which single_run.xml is the only relevant one in the given context (the other two deal with HydPy’s server functionalities):
>>> assert_exists("HydPy-H-Lahn", "single_run.xml")
Any XML file compatible with the script function run_simulation(), like
single_run.xml, must comply with the XML Schema Definition file
HydPyConfigSingleRun.xsd. If you work with a capable IDE or XML editor, it uses
these definitions to assist you in writing a new or modifying an existing XML file. At
the very least, it should warn you if your XML file violates the schema file.
Without a capable IDE or XML editor, or if you want to include automatic XML
validation in your workflow, the script function xml_validate() (which relies on the
xmlschema library) might be a good option. We use it as the first example to
demonstrate HydPy’s command line usage.
With a standard HydPy installation on your computer (and, if necessary, the right environment activated), you can trigger HydPy with the command hyd.py. Open a terminal, change into the already prepared working directory, type hyd.py, and press enter:
hyd.py
In the following examples, we fake the usage of a terminal with the help of function
run_subprocess(), which runs the given commands in a separate subprocess as if typed in
a terminal:
>>> from hydpy import run_subprocess
If we only type hyd.py, HydPy informs us that we must tell it what to do by naming the suitable script function:
>>> subprocess = run_subprocess("hyd.py")
Invoking hyd.py without arguments resulted in the following error:
The first positional argument defining the function to be called is missing.
...
Use the process’s return code to determine whether it was successful. In this case, it was not, so the return code is unequal zero:
>>> assert subprocess.returncode != 0
Specifying the relevant script function is not enough, as xml_validate()
(understandably) must know which file to check:
>>> subprocess = run_subprocess("hyd.py xml_validate")
Invoking hyd.py with argument `xml_validate` resulted in the following error:
Function `xml_validate` requires `1` positional arguments (xmlpath), but `0` are given.
...
After adding the relative or absolute path, xml_validate() informs us by a message and
a zero return code that single_run.xml is valid:
>>> subprocess = run_subprocess("hyd.py xml_validate HydPy-H-Lahn/single_run.xml")
HydPy-H-Lahn/single_run.xml successfully validated
>>> assert subprocess.returncode == 0
Note that “valid” here only means the XML file’s compliance with HydPyConfigSingleRun.xsd. It is still possible that its configurations do not fit the HydPy-H-Lahn project. For example, single_run.xml could select a simulation period not met by the available input time series.
With a ready XML file, starting a simulation run via method run_simulation() is easy:
>>> subprocess = run_subprocess("hyd.py run_simulation HydPy-H-Lahn single_run.xml")
Start HydPy project `HydPy-H-Lahn` (...).
Read configuration file `single_run.xml` (...).
Interpret the defined options (...).
Interpret the defined period (...).
Read all network files (...).
Create the custom selections (if defined) (...).
Activate the selected network (...).
Read the required control files (...).
Read the required condition files (...).
Read the required time series files (...).
Perform the simulation run (...).
Write the desired condition files (...).
Write the desired time series files (...).
The printed response clarifies that run_simulation() essentially executes the same
steps as we did in the Simulation > Python section above.
One step that goes beyond the Python example is the creation of selections. Previously, we only used the already available selection headwaters defined by the network file headwaters.py. The XML file goes further and creates three new selections by specifying individual elements (from_devices), keywords (from_keywords), and other selections (from_selections). All these definitions occur within the XML element add_selections. The defined selections help configure the reader and writer XML elements not to read and write data needlessly.
The User Guide’s Options section provided more introductory information on configuring XML files.
For purposes like operational forecasting, one might wish to reuse a predefined XML file with some aspects, such as the simulation period, changed. For this, HydPy offers an XML template mechanism. With single_run.xmlt, the HydPy-H-Lahn project contains one example of an XML template file:
>>> assert_exists("HydPy-H-Lahn", "single_run.xmlt")
This template contains three special XML comments in lines
<firstdate><!–|firstdate=1996-01-01T00:00:00|–></firstdate>,
<prefix><!–|prefix=init|–></prefix>, and <zip><!–|zip_=false|–></zip>. The
parts <!– and –> define a usual XML comment. As such comments count as nothing,
xml_validate() reports the following error when checking single_run.xmlt:
>>> subprocess = run_subprocess("hyd.py xml_validate HydPy-H-Lahn/single_run.xmlt")
failed decoding '' with XsdAtomicBuiltin(name='xs:dateTime'):

Reason: Invalid datetime string '' for <class 'elementpath.datatypes.datetime.DateTime10'>
...
Path: /hpcsr:config/timegrid/firstdate
The HydPy-specific parts, |firstdate=1996-01-01T00:00:00|, |prefix=init|, and
|zip_=false|, indicate that xml_replace() is supposed to replace the respective whole
XML comment. In the following example, we pass only data to the argument zip_:
>>> subprocess = run_subprocess("hyd.py xml_replace HydPy-H-Lahn/single_run zip_=wrong")
template file: HydPy-H-Lahn/single_run.xmlt
target file: HydPy-H-Lahn/single_run.xml
replacements:
  firstdate --> 1996-01-01T00:00:00 (default argument)
  prefix --> init (default argument)
  zip_ --> wrong (given argument)
Following the printed summary, xml_replace() used the given value wrong for the
argument zip_ and the default values 1996-01-01T00:00:00 and init for the
arguments firstdate and prefix (one must not define such default values; with a
line like <zip><!–|zip_|–></zip> one would always have to pass data for the
argument zip_).
Although technically successful, the replacement was flawed because, as xml_validate()
can tell us, wrong is not a boolean value, as would be required:
>>> subprocess = run_subprocess("hyd.py xml_validate HydPy-H-Lahn/single_run.xml")
failed decoding 'wrong' with XsdAtomicBuiltin(name='xs:boolean'):

Reason: 'wrong' is not a boolean value
...
Path: /hpcsr:config/conditions_io/zip
